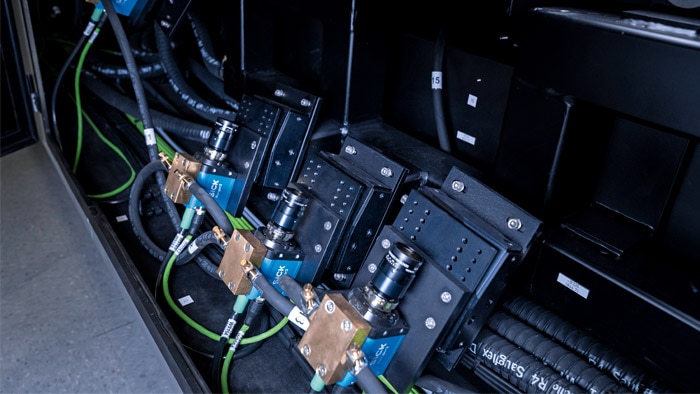
Ranger3 irons out any issues for 3D inspection in steelworks

Jul 12, 2019

When it comes to optical 3D inspections in thermal production processes for continuous casting plants, hot rolling mills, and tube rolling mills, flickering surfaces, heat, tinder, dirt, and moisture are all par for the course. But for IMS Messsysteme GmbH as market leaders in precisely this field, handling these challenges is a fundamental aspect of their core skill set. For more than a year now, the company has been using a 3D vision sensor in the form of the Ranger3 from SICK, which significantly improves the performance of its own inspection systems while at the same time opening up new fields of application and business opportunities.


The Ranger3 streaming camera is setting the future standard for industrial 3D image processing in regards to technology, speed, resolution, and ease of integration. With its innovative ROCC technology (rapid-on-chip-calculations) developed by SICK, it can process up to 15.4 gigapixels per second, enabling full-frame 3D imaging (2,560 x 832 pixels) at a speed of 7 kHz. As a result, the Ranger3 3D vision camera is capable of taking high-resolution 3D measurements of dimensions, contours, and surface properties even in rapid production and inspection processes in order to detect the most minute deviations and faults. The contour detection of the laser line, which is projected onto the object, takes place regardless of color and contrast, from the ambient brightness or – as is the case for IMS Messsysteme – from the visual appearance of profiles, slabs, or pipes flickering with heat.


IMS Messsysteme: Market leaders for optical inspections in the steel, aluminum, and metal industry

IMS Messsysteme GmbH in Heiligenhaus develops and produces isotope, X-ray, and optical measurement systems for industrial applications in the steel and non-ferrous-metals industry. Founded in 1980, the company now employs around 450 employees across five continents. “We have asserted ourselves as the technological and market leaders in continuous casting plants, hot rolling mills and tube rolling mills with complete solutions such as the X-3Dvision measurement system,” explains Dipl.-Ing. Zvezdan Pejovic, Product and Sales Manager for optical 3D inspection systems at IMS. In just a single step, the systems are capable of checking long-goods profiles and pipes in terms of their dimensions, contours, and linearity, as well as for surface defects such as cracks, deposits, inclusions, or indentations – even under the harshest conditions. “The earlier faults are detected, the quicker it is to correct machining processes and avoid rejects,” explains Zvezdan Pejovic. “This is why our measurement systems are even used as far upstream as the thermal production process. The temperatures of the profiles and pipes are still almost 1000 °C here, which places huge demands not only on the measurement technology itself, but also on the mechanical structure of the measurement systems.”


The X-3Dvision measurement systems from IMS are used for 360° inspection of products with a wide range of geometric properties. “In order to capture the entire surface of profiles or pipes seamlessly, we integrate multiple cameras and laser lighting devices into a single, circular measurement setup through which the long goods are passed for inspection – and that’s basically all there is to it,” clarifies Zvezdan Pejovic. “The metrological components are integrated into the robust frame construction where they are protected against direct contact with the harsh surrounding environment. In addition, the cameras and laser transmitters are cooled by air and water to ensure stable ambient temperatures for precise and reproducible measurement results.” Precision is one of the real strengths of the IMS measurement systems. When it comes to contour measurements, the company offers a typical resolution of 0.05 mm and repeatability of ± 0.08 mm. As for surface inspections, furrows, cracks and scratches measuring as little as 0.3 mm wide, 10 mm long, and 0.3 mm deep can be measured and detected reliably (for example: in an existing installation downstream of the stretch-reducing mill, based on a production speed of 10 m/s). Both the dimensional and contour measurement as well as the inspection of the surfaces can therefore be carried out with a specified level of accuracy and repeatability down to the submillimeter range, ensuring products are always manufactured to the highest quality.
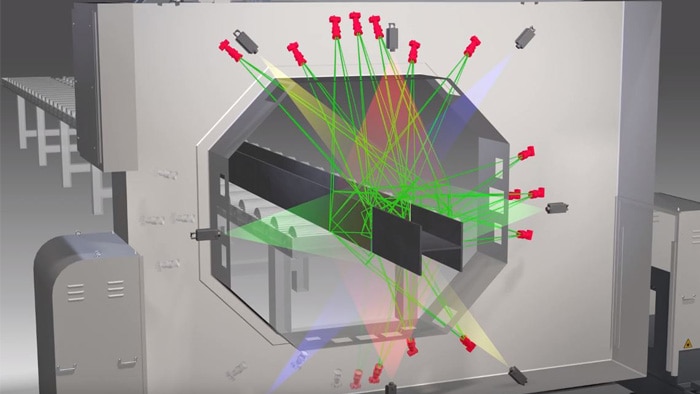
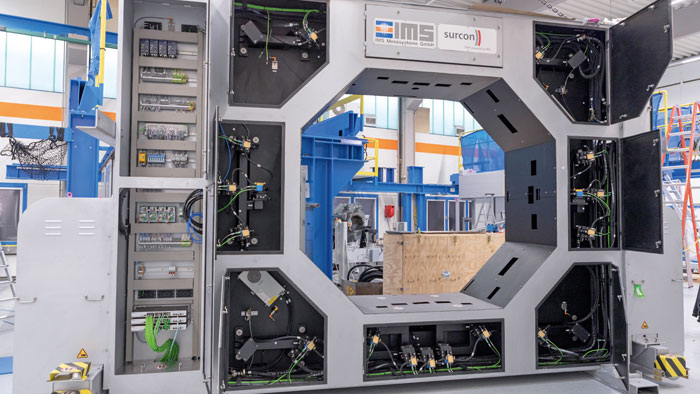
 
IMS optical inspection in the steel industrie with Ranger3


Measurement system with 22 Ranger3 cameras for a complete profile range

The measurement systems from IMS feature between three and eight cameras depending on the type and contours of a long product to ensure 360° inspection. “In one of our latest plants, however, we have integrated significantly more 3D vision sensors – 22 Ranger3 units, to be precise,” notes Zvezdan Pejovic. “This allowed us to meet our customer’s request for a single, high-precision measurement and inspection system to handle its full range of H, L, C, and CZ profiles and sheet piling walls.” 


SICK has developed ROCC technology to calculate 3D data directly within the camera. The CMOS sensor in the Ranger3 converts the laser line recorded on the object into a precise 3D representation. This means that the camera can store complete 3D coordinates for the X-3Dvision measurement system without the need for complex post-processing. At the same time, the Gigabit Ethernet interface for the streaming camera ensures even large volumes of measurement data can be transferred in real time. “Depending on the application, the cameras are capable of creating up to 24,000 profiles per second, which represents a data throughput for all of the cameras of up to 4 Gbits per second,” confirms Zvezdan Pejovic. “The Ranger3 cameras from SICK have allowed us to develop our X-3Dvision into an inline system for multi-profile inspection. This is capable of achieving an extremely high level of accuracy even at challenging speeds. At the same time, it can even pick up on the tiniest of deviations to ensure adjustments can be made immediately to casting and rolling processes.”

The Vision sensor Ranger3 by  SICK


New applications with Ranger3

The question still remains as to why it is so important to ensure even the most minute deviations and faults can be detected reliably in products as strong as profiles and tubes made of steel, iron, or aluminum with the help of high-resolution 3D-vision sensors. “On the one hand, this is simply a fundamental consideration,” notes Zvezdan Pejovic. “As market leaders, we at IMS are committed to providing our customers with accurate, reliable, and rugged measurement systems to ensure their products remain competitive on the global market. The other aspects are of a more practical and financial nature. Faulty dimensions and measurements can lead to complaints and even to companies refusing to accept the resulting products for further processing.”

But with the help of the Ranger3 streaming camera from SICK, IMS not only ensures maximum quality in terms of both products and processes, but also opens up new market opportunities for companies. “The high measurement and transfer rates of the 3D vision sensors from SICK open up whole new fields of application for our inspection systems wherever high process speeds are required in production processes,” explains Zvezdan Pejovic. “This applies to the production of rails, for example, and even more so to the production of rod materials or wire rod with feed speeds of up to 100 m/s.” 


For IMS, the Ranger3 is the preferred choice on account of not only its performance, but also its potential as an enabling technology for the company’s future applications of the measurement system.


Andreas Behrens

Head of Product Management Identification & Vision

As the Manager of the Marketing & Sales Business Unit Andreas Behrens and his team are responsible for, among other things, the market-oriented and forward-looking expansion of the product range in the Identification and Vision Technology Department. As Head of Market Product Management he already had been in charge for the complete portfolio of SICK.


Do you have any questions?

Contact our experts

I want to stay up to date and regularly be informed about new articles!

Register now